
The purpose of this tutorial is to configure Apache NiFI to use Kerberos authentication against a Microsoft SQL Server, query the database, convert the output to JSON, and output that data in syslog format. NiFi is capable of doing all of this with minimal configuration.
Overview
I'd like to start by apologizing for any of the SQL, Active Directory, or Kerberos terminology that I'll eventually get incorrect. My knowledge of those technologies is minimal at best, e.g. part of the setup was learning how to log into MS-SQL, create a dummy database, and then get authentication working with Kerberos. This process should be much faster if you've got a team that already supports that.
There is a troubleshooting section at the end that walks through all the troubleshooting steps that were used, along with links to the corresponding sites.
The overall purpose of this tutorial is to get Apache NiFi pulling from an MS-SQL database using Kerberos authentication, converting the output to JSON format, and streaming that to a remote log collection platform.
Active Directory and SQL Server Setup
Disclaimer
Please note that most of this is for testing purposes. If you already have a "real" SQL Server connected to Active Directory and using Kerberos authentication, then you can likely skip most of this section. I'm using the steps below since I needed to create a Windows lab for this guide.
Configuring the Windows Environment
On the Microsoft side, I deployed Windows Server 2019 for Active Directory services and another Windows Server 2019 for SQL Server 2019. Both are on the domain YOURDOMAIN.CORP for example purposes. The setup looks like this:
Windows Server 2019
Active Directory Services
Hostname: AD-00.YOURDOMAIN.CORP

Windows Server 2019
SQL Server 2019
Hostname: SQL-00.YOURDOMAIN.CORP

Ubuntu 20.04
NiFi 1.11.4
Hostname: NIFI-DEV.OTHERDOMAIN.INTERNALThe SQL-00 and NIFI-DEV servers should be pointed to AD-00 for DNS resolution. You can check the Kerberos settings with a simple nslookup query:
PS C:\Users\Administrator> nslookup -type=srv _kerberos._tcp.YOURDOMAIN.CORP
Server:  localhost
Address:  ::1

_kerberos._tcp.YOURDOMAIN.CORP  SRV service location:
          priority       = 0
          weight         = 100
          port           = 88
          svr hostname   = ad-00.yourdomain.corp
ad-00.yourdomain.corp internet address = 10.78.50.210The Active Directory User Account
I then created a service account callednifilogin on the YOURDOMAIN.CORP domain. This is the account that will be used by NiFi to authenticate via Kerberos into SQL Server 2019. For simplicity, I would remove the requirement that the user must change the password at login. Obviously not the best security practice, but there is no easy way to change the password from NiFi. Otherwise, you'll need to log into a workstation with the account and log back out after you've changed the password.
Microsoft SQL Server 2019 Setup
Please note that this was only necessary since I didn't have any sample data to work with. If you've already got SQL Server up and running with data, then there is no reason to load the sample database below. You can skip down to the Configuring Apache NiFi section.
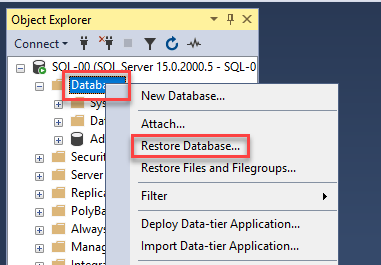
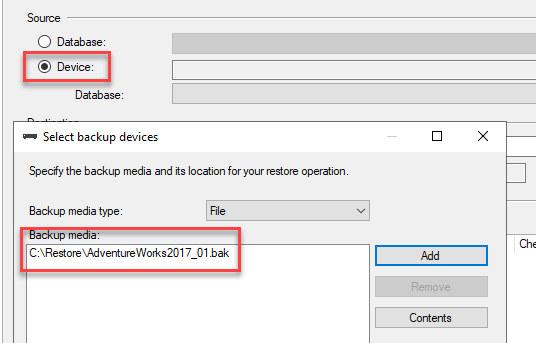
I ended up installing Microsoft SQL Server Management Studio and downloading the AdventureWorks database for testing purposes. I opted for AdventureWorks2017.bak and saved the file in the directory C:\Restore. Simply open SSMS, log in with default credentials, right-click on Databases, and select Restore Database. Click on Device, add the C:\Restore directory, and then add the database backup.
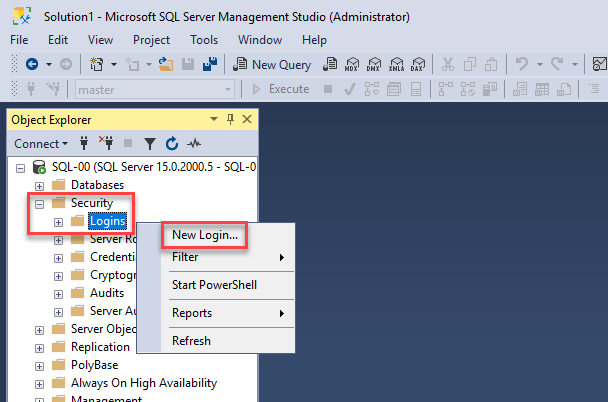
The next step is to create a user account that has access to the database. We'll be using "Windows authentication" for the user authentication type. In SSMS, go to Security -> Logins, right click, and select New Login. You'll then use the account you'd created about for the Login name, e.g. "nifilogin".
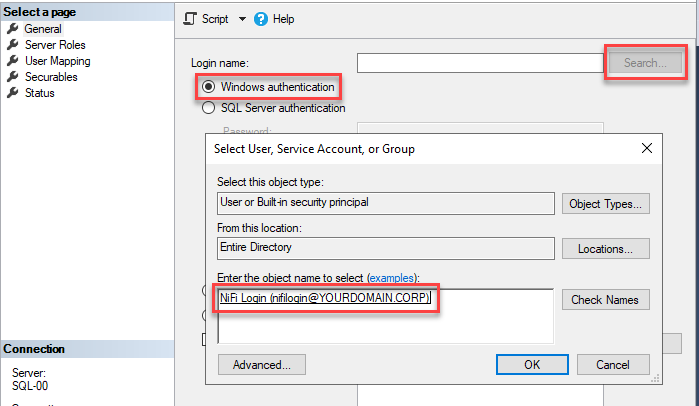
As mentioned above, I have zero expertise in Microsoft SQL, so I'm not 100% sure if the following step is necessary. I went to User Mapping, clicked on AdventureWorks2017, and mapped it to the user YOURDOMAIN\nifilogin. Again, if you already have expertise on staff, they should be able to ensure the account has read access to the database you'll be querying.
Configuring Apache NiFi
Background
NiFi can be configured using my previous instructions. Keep in mind it's a Java application and can be deployed on various platforms, e.g. Microsoft Window. In my case, I'm using Ubuntu 20.04 and OpenJDK 11 for the NiFi environment. The NiFi server does not need to be part of the Active Directory environment.
Kerberos Basics
You'll first want to ensure the NiFi server is using the same DNS server as your Active Directory domain. As mentioned above, the NiFi server does not need to join the domain: it just needs to be using the same DNS server. In my lab scenario, DNS is running on the Active Directory server, so I've got everything pointed to AD-00 as the DNS resolver. This allows the Ubuntu server running NiFi to resolve everything associated with the YOURDOMAIN.CORP domain.
Adding the Microsoft SQL Drivers to NiFi
The first step is to add the Microsoft SQL drivers to NiFi. There are multiple versions of the JAR file depending on the Java version that you are using, e.g. if you're using Java 11, then use the Java 11 version of the driver. The drivers can be downloaded from here:
 microsoft
You can also download the driver directly to your NiFi server using wget or curl. I'm using the preview version of the driver, but you'll likely want the stable version if you're running this in a production environment. Pay attention to the name of the file you're downloading since you'll be using it later.
wget https://github.com/microsoft/mssql-jdbc/releases/download/v8.3.1/mssql-jdbc-8.3.1.jre11-preview.jar
sudo mkdir /opt/nifi/drivers
sudo mv mssql-jdbc-8.3.1.jre11-preview.jar /opt/nifi/drivers/Configuring Kerberos Settings on NiFi
The first step is to create the Kerberos configuration directory:
sudo mkdir /opt/nifi/kerberosThe next step is to create the configuration files. This is where having an actual Active Directory administrator is useful: they should be able to provide you with the correct host names where needed. You'll want to swap out the YOURDOMAIN.CORP references with your actual domain.
sudo vi /opt/nifi/kerberos/jaas.conf

### Add the following to the file.
SQLJDBCDriver {
  debug=true
  com.sun.security.auth.module.Krb5LoginModule required
  doNotPrompt=false
  useTicketCache=false;
};
Please note that debug=true can be removed from the configuration if you're not doing any troubleshooting. We'll then need to create another configuration file with the Kerberos settings. I also learned the hard way that Kerberos likes everything to be in upper-case, so you'll likely want to keep it that way unless your Active Directory administrator says otherwise.
sudo vi /opt/nifi/kerberos/krb5.ini

### Add the following to the file.
[libdefaults]
default_realm = YOURDOMAIN.CORP
dns_lookup_realm = false
dns_lookup_kdc = true

[domain_realm]
yourdomain.corp = YOURDOMAIN.CORP
.yourdomain.corp = YOURDOMAIN.CORP

[realms]
YOURDOMAIN.CORP = {
  kdc = YOURDOMAIN.CORP
  admin_server = YOURDOMAIN.CORP
  master_kdc = YOURDOMAIN.CORP
  default_domain= YOURDOMAIN.CORP
}
The next step is to get these files loaded into the NiFi configuration. Please note the numeric value in java.arg, e.g. java.arg.20. These should always be sequential. The numbers below should work with the default configuration unless you've already changed the related values in the configuration.
sudo vi /opt/nifi/conf/bootstrap.conf

### Add these lines to the end of the bootstrap.conf file.
java.arg.18=-Djava.security.auth.login.config=/opt/nifi/kerberos/jaas.conf
java.arg.19=-Djava.security.krb5.conf=/opt/nifi/kerberos/krb5.ini
java.arg.20=-Dsun.security.krb5.debug=trueThe java.arg.20=-Dsun.security.krb5.debug=true line is obviously there to assist with debugging. You can remove it if necessary. Next we'll restart NiFi and tail the log file to ensure there are not any errors:
sudo service nifi restart; tail -f /opt/nifi/logs/nifi-bootstrap.logCreate the NiFi Flow
We'll start by logging into the NiFi interface. This is listening on port 8080 by default, e.g. http://nifi-dev.otherdomain.internal:8080.
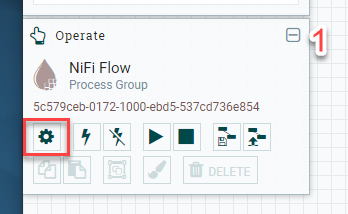
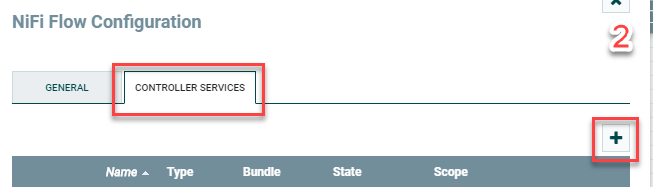
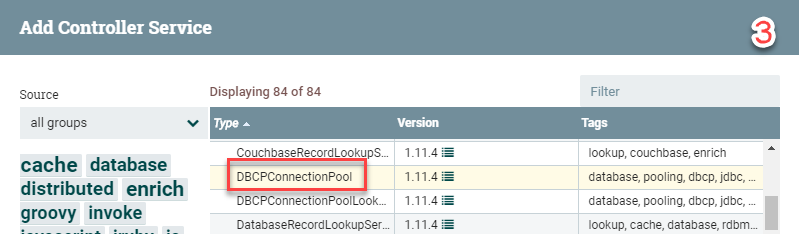
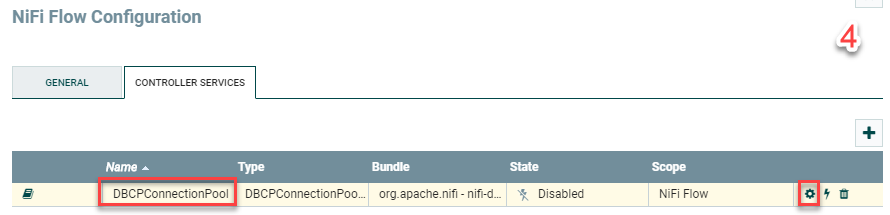
The first component we'll add is the DBCPConnectionPool Controller Service. This provides the NiFi flow with the details around the MS-SQL connection, including the authentication components. Click anywhere on the canvas so nothing is selected. You'll then click the cog icon inthe lower-left portion of the canvas, go to Controller Services, click on the + symbol to add a new service, select the DBCPConnectionPool service, and ADD.
This will then add the controller service named DBCPConnectionPool by default. You'll then click on the cog icon to configure it.
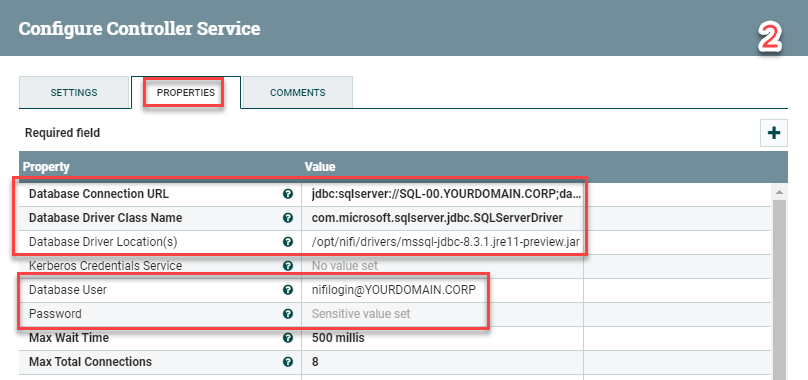
I'll list out the settings for DBCPConnectionPool below since it's a lot of copying and pasting. We'll also be renaming DBCPConnectionPool to MS-SQL in the settings too. Keep in mind that you'll want to swap out the host name, database name, driver location, and credentials with your own values. The Database Connection URL should be changed to reflect your SQL server and the database name you'll be querying.
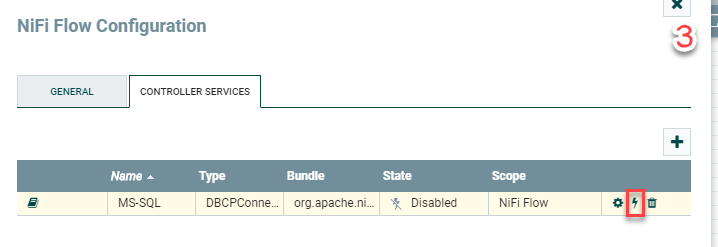
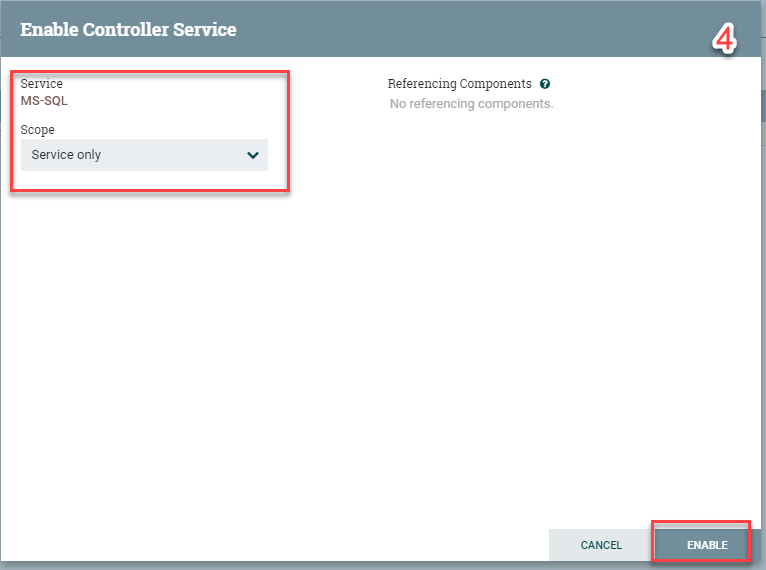
In addition, the Database Driver Location option will include the MS-SQL JAR filename that you downloaded in the previous steps. Be sure to change the Database User and Password too. Click Apply when done followed by the "Enable" lightning-bolt icon. Another window will pop up. You can leave this Service only and click Enable.
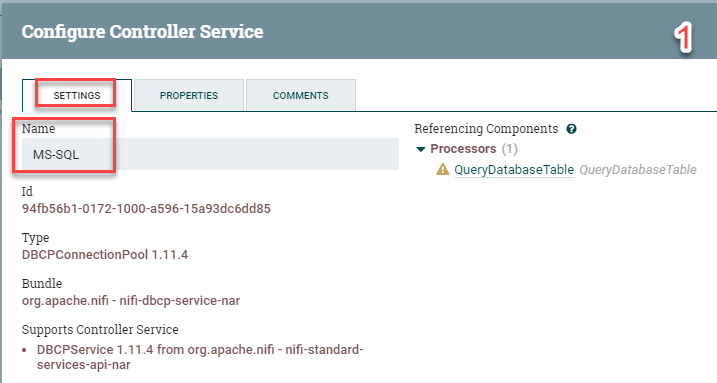
Settings:
  Name: MS-SQL

Properties:
  Database Connection URL: jdbc:sqlserver://SQL-00.YOURDOMAIN.CORP;database=AdventureWorks2017;integratedSecurity=true;authenticationScheme=JavaKerberos;
  Database Driver Class Name: com.microsoft.sqlserver.jdbc.SQLServerDriver
  Database Driver Location: /opt/nifi/drivers/mssql-jdbc-8.3.1.jre11-preview.jar
  Database User: nifilogin@YOURDOMAIN.CORP
Password: p4ssw0rd#$The next step and first processor we'll add is the QueryDatabaseTable processor:
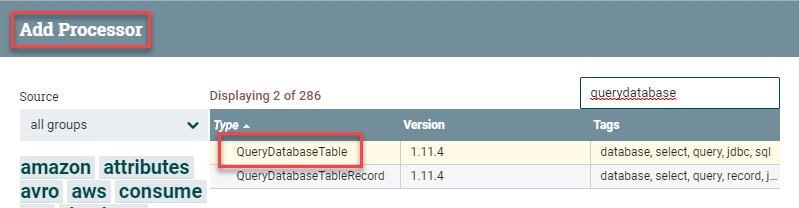
Once the processor is on the canvas, double-click on it to open the settings. You'll want to adapt the following values to your environment.
Scheduling:
Run Schedule: 1 min
### This will query the table for new data every 1 minute.
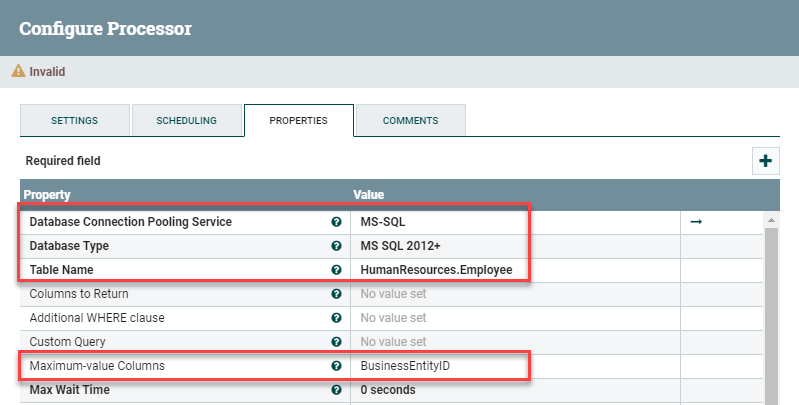
Properties:
Database Connection Pooling Service: MS-SQL
### That is the controller service you created.
Database Type: MS SQL 2012+
### That version should cover most use cases.
Table Name: HumanResources.Employee
### It's essentially a "select * from HumanResources.Employee"
Maximum-value Columns: BusinessEntityID
### This should be an auto-incrementing value.
### Use one, otherwise NiFi will fetch the entire table each time.
The next processor we'll add is the ConvertAvroToJSON processor. This tells NiFi to take the results from the database query and convert them into JSON format. This works great with a SQL query since you're dealing with name:value pairs. There isn't muich configuration to this processor other than checking the box Failure under Automatically Terminate Relationships.

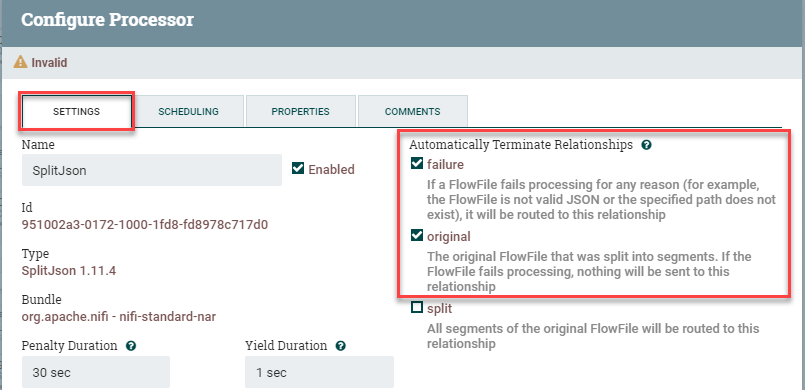
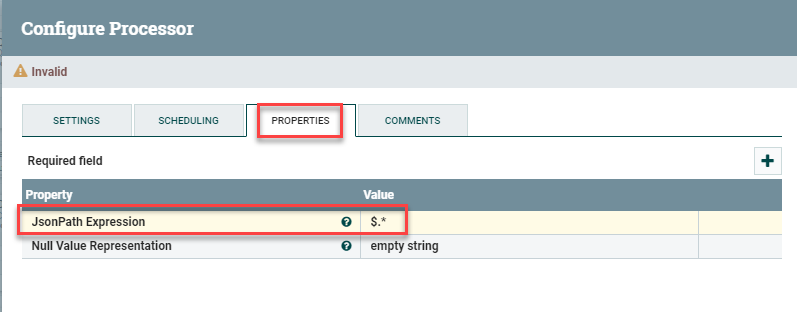
The next processor we'll add is SplitJson. By default, the query output will be one giant blob of data. We'll want to split these into individual events that will be converted over to syslog. Drag a SplitJson processor onto the canvas. You'll only need to change a few values here. Under Settings, check Failure and Original under Automatically Terminate Relationships. Then, under Properties, add $.* for the JsonPath Expression. This tells it to split every line into a new event.
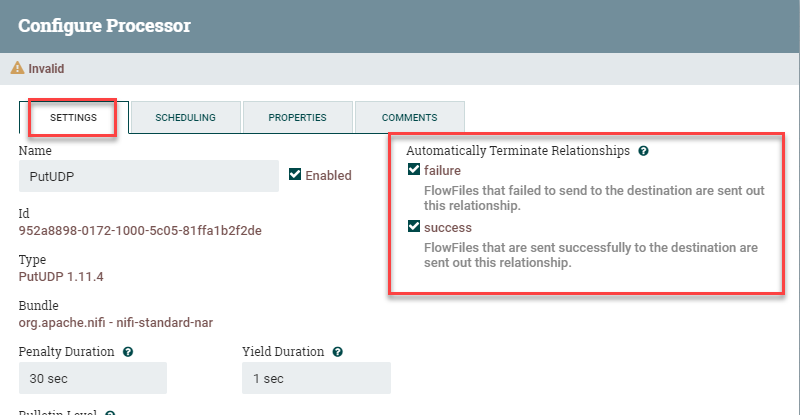
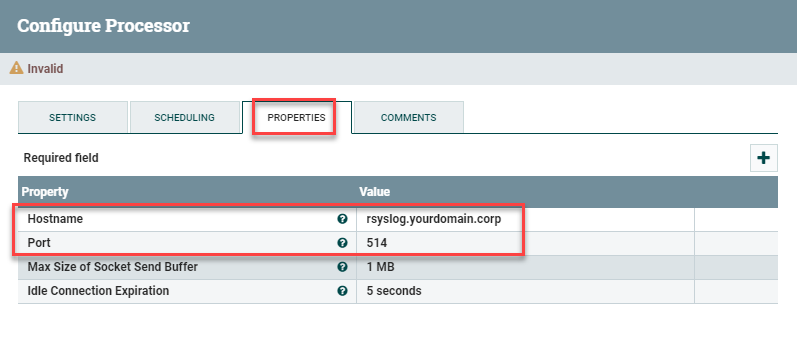
The last processor we'll add is the PutUDP processor. This takes those individual events from above and sends them out in native syslog format. Drag the processor onto the canvas and put in the following settings: under Automatically Terminate Relationships, check the Failure and Success options. This processor is the "last stop" for the flow, so we'll be terminating everything here. Next, you'll want to go into Properties and plug in the Hostname and Port you'll be sending to, e.g. rsyslog.yourdomain.corp and port 514.
You should now have 4 processors on your canvas. Next week connect them up. We've already specified the terminations, so there shouldn't be anything beyond connecting them up:
QueryDatabaseTable to ConvertAvroToJSON
For Relationship: Success
Add

ConvertAvroToJSON to SplitJson
For Relationship: Success
Add

SplitJson to PutUDP
For Relationship: Split
AddYou'll end up with this:

The last step is to click on a blank spot in the canvas so nothing is selected, right click on the screen, and select Start. If all goes well, NiFi should start pulling the events from the database, converting them to JSON, and streaming them out.
Example Output in Elastic
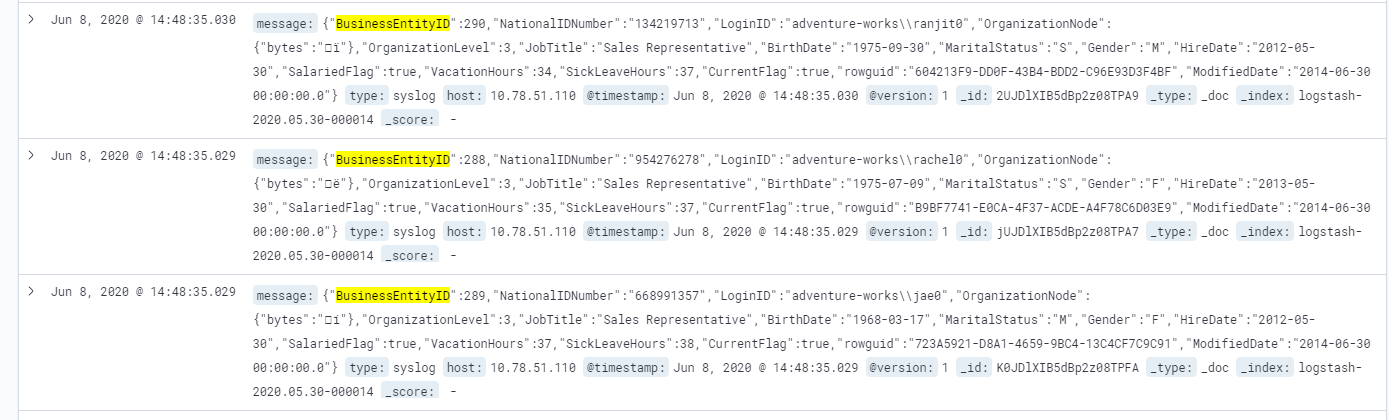
This took quite a bit of trail and error, but I was able to get it working in three different lab environments using the instructions above.
Good luck and happy log collecting!
Troubleshooting Steps
As mentioned above, this took a lot of troubleshooting before I was able to get everything running as expected. I've listed out as much as possible, including all of the sites that were used in the setup and troubleshooting process. I'd really like to thank the individual that wrote this guide which got me started:
 Daniel Ahn
SQL Server
Start with the usual question: is port 1433/TCP open on the SQL server? I was burned by this a few times, mainly because (1) the Windows firewall was enabled and (2) SQL Server does not appear to listen on port 1433/TCP by default. You can start with nmap to determine if the port is open:
root@nifi-dev:/home/nlabadie# nmap -p 1433 sql-00.yourdomain.corp
Starting Nmap 7.80 ( https://nmap.org ) at 2020-06-08 14:43 EDT
Nmap scan report for sql-00.yourdomain.corp (10.78.50.215)
Host is up (0.00027s latency).

PORT     STATE    SERVICE
1433/tcp filtered ms-sql-s
MAC Address: 00:0C:29:6C:B2:74 (VMware)

Nmap done: 1 IP address (1 host up) scanned in 0.43 secondIf the host is listed as down or the port as filtered, then you'll want to get that resolved first so NiFi can connect. I first configured SQL Server to listen on 1433/TCP using the following steps:
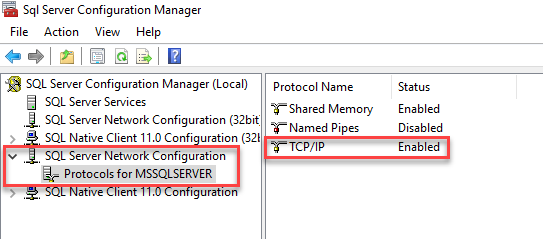
Go to Start -> Microsoft SQL Server 2019 -> SQL Server 2019 Configuration Management. Click on SQL Server Network Configuration -> Protocols for MSSQLSERVER. On the right, ensure that TCP/IP is set to Enabled. You'll also need to restart the service if it wasn't enabled.
...but I was still getting filtered as the response. My next guess was the Windows firewall blocking the connection. Sure enough, I disabled the firewall and was able to connect to the port. This is a horrible security practice though, so you'll want to open the port to just the NiFi host if it isn't already. You should see something like this if everything is working as expected at the network layer:
root@nifi-dev:/home/nlabadie# nmap -p 1433 sql-00.yourdomain.corp
Starting Nmap 7.80 ( https://nmap.org ) at 2020-06-08 14:46 EDT
Nmap scan report for sql-00.yourdomain.corp (10.78.50.215)
Host is up (0.00036s latency).

PORT     STATE SERVICE
1433/tcp open  ms-sql-s
MAC Address: 00:0C:29:6C:B2:74 (VMware)

Nmap done: 1 IP address (1 host up) scanned in 0.22 secondsKerberos with Service Principal Name
I'm not going to pretend that I understand how SPNs are supposed to function. Fortunately SQL Server seems to enable one automatically after it's configured:
PS C:\Users\Administrator> setspn -L SQL-00
Registered ServicePrincipalNames for CN=SQL-00,CN=Computers,DC=YOURDOMAIN,DC=CORP:
        MSSQLSvc/SQL-00.YOURDOMAIN.CORP
        RestrictedKrbHost/SQL-00
        HOST/SQL-00
        RestrictedKrbHost/SQL-00.YOURDOMAIN.CORP
HOST/SQL-00.YOURDOMAIN.CORPNotice the MSSQLSvc/SQL-00.YOURDOMAIN.CORP line: that means SQL is registered. If you're unfortunate enough that one doesn't exist, here are some extended reading material and troubleshooting commands on the topic that were used:
- https://petri.com/how-to-use-setspn-to-set-active-directory-service-principal-names-2
- https://docs.microsoft.com/en-us/sql/connect/jdbc/using-kerberos-integrated-authentication-to-connect-to-sql-server?view=sql-server-ver15
- https://www.sqlshack.com/overview-of-service-principal-name-and-kerberos-authentication-sql-server/
- https://www.red-gate.com/simple-talk/sql/database-administration/questions-about-kerberos-and-sql-server-that-you-were-too-shy-to-ask/
- https://docs.microsoft.com/en-us/sql/database-engine/configure-windows/register-a-service-principal-name-for-kerberos-connections?view=sql-server-ver15
Verifying That Kerberos Is Being Used in SQL Server
Here are instructions that can be used to determine if any of the accounts are using Kerberos instead of NTLM, along with the associated query:
select auth_scheme from sys.dm_exec_connections where session_id=@@spidYou're good to go if it says KERBEROS as the output for any of the existing session. Here's another query that provides more details than above:
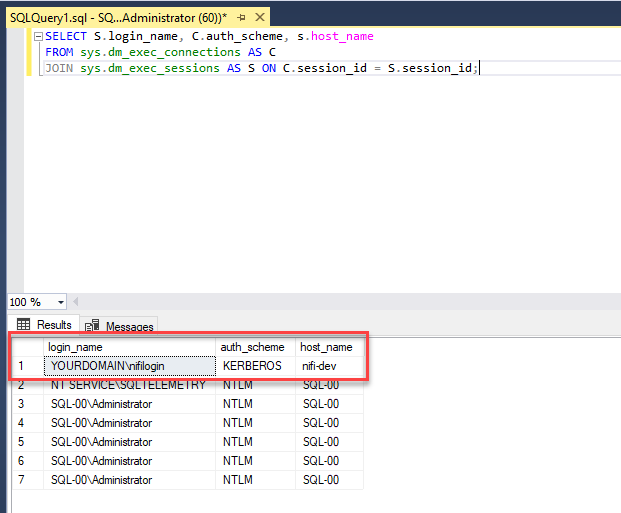
SELECT S.login_name, C.auth_scheme, s.host_name
FROM sys.dm_exec_connections AS C
JOIN sys.dm_exec_sessions AS S ON C.session_id = S.session_id;You'll probably see a mix of NTLM and Kerberos in the output. I didn't have a session listing KERBEROS until I got the authentication from NiFi working.
Troubleshooting NiFi
Google is your best friend here. Kerberos spits out a lot of cryptic errors. I tracked most of them down along with recommended solutions by just searching for them. However, to get the Java Kerberos errors, you'll first need to enable the debugging options that were included in the instructions. Specifically, the debug=true and java.arg.20=-Dsun.security.krb5.debug=true options that were included in the instructions above.
Once those are enabled, you can view the logs in two different places:
tail -f /opt/nifi/logs/nifi-app.log
tail -f /opt/nifi/logs/nifi-bootstrap.logHere is some sample output from the nifi-bootstrap.log file:
2020-06-06 14:30:41,264 INFO [NiFi logging handler] org.apache.nifi.StdOut >>> KrbKdcReq send: #bytes read=1562
2020-06-06 14:30:41,265 INFO [NiFi logging handler] org.apache.nifi.StdOut >>> KdcAccessibility: remove NATERLABS.internal
2020-06-06 14:30:41,273 INFO [NiFi logging handler] org.apache.nifi.StdOut >>> EType: sun.security.krb5.internal.crypto.Aes256CtsHmacSha1EType
2020-06-06 14:30:41,273 INFO [NiFi logging handler] org.apache.nifi.StdOut              [Krb5LoginModule] authentication failed
2020-06-06 14:30:41,273 INFO [NiFi logging handler] org.apache.nifi.StdOut Message stream modified (41)
2020-06-06 14:30:41,274 INFO [NiFi logging handler] org.apache.nifi.StdOut              [Krb5LoginModule]: Entering logout
Cryptic, but I realized that I had references to the wrong domain in there.
Here is output from the nifi-app.log file:
2020-06-07 18:04:41,740 ERROR [Timer-Driven Process Thread-7] o.a.n.p.standard.QueryDatabaseTable QueryDatabaseTable[id=8aab3533-0172-1000-1bc9-d3dc144b9a1e] Unable to execute SQL select query SELECT * FROM HumanResources.Employee due to org.apache.nifi.processor.exception.ProcessException: java.sql.SQLException: Cannot create PoolableConnectionFactory (The TCP/IP connection to the host AD-00.YOURDOMAIN.CORP, port 1433 has failed. Error: "Connection refused (Connection refused). Verify the connection properties. Make sure that an instance of SQL Server is running on the host and accepting TCP/IP connections at the port. Make sure that TCP connections to the port are not blocked by a firewall.".): org.apache.nifi.processor.exception.ProcessException: java.sql.SQLException: Cannot create PoolableConnectionFactory (The TCP/IP connection to the host AD-00.YOURDOMAIN.CORP, port 1433 has failed. Error: "Connection refused (Connection refused). Verify the connection properties. Make sure that an instance of SQL Server is running on the host and accepting TCP/IP connections at the port. Make sure that TCP connections to the port are not blocked by a firewall.".)
org.apache.nifi.processor.exception.ProcessException: java.sql.SQLException: Cannot create PoolableConnectionFactory (The TCP/IP connection to the host AD-00.YOURDOMAIN.CORP, port 1433 has failed. Error: "Connection refused (Connection refused). Verify the connection properties. Make sure that an instance of SQL Server is running on the host and accepting TCP/IP connections at the port. Make sure that TCP connections to the port are not blocked by a firewall.".)
In this case it was easy to determine that port 1433/TCP was not responding.