

Disclaimer:
This guide makes a few assumptions: you have Proxmox 6.2 configured, you have an Nvidia card, and you've configured an Arch Linux container. There are a lot of guides that I grabbed bits and pieces from to get this working. I basically ended up working backwards through my bash history to put this together. In retrospect, I should have kept a running list to provide credit at the end.
Summary
The purpose of this guide is to (1) get the Nvidia card working with Proxmox and (2) give the Arch Linux container access to the video card. Why? Because containers are awesome and the Nvidia card can be shared among them.
Configuring Proxmox
Enabling the Nvidia Driver
The latest supported Nvidia driver is in Buster Backports. We'll first need to enable this before installing the driver. As root in Proxmox:
echo 'deb http://deb.debian.org/debian buster-backports main contrib non-free' >> /etc/apt/sources.list.d/buster-backports.list
echo 'deb-src http://deb.debian.org/debian buster-backports main contrib non-free' >> /etc/apt/sources.list.d/buster-backports.list
apt updateWe'll now install the kernel headers. I typically install these regardless since you'll need for any other kernel modules, e.g. Wireguard.
apt install pve-headersNext we'll install the Nvidia drivers and SMI tool from Buster Backports:
apt install -t buster-backports nvidia-driver nvidia-smiPlease note that you'll get a warning about rebooting if you've previously installed another version of the Nvidia driver. Also take note of the Nvidia build number: it's 440.100 as of writing this guide. You'll need the same version for your Arch Linux container to function correctly. There are a few more steps to configure before we reboot, mainly to ensure everything is loaded as expected.
echo 'nvidia' >> /etc/modules
echo 'nvidia_uvm' >> /etc/modules

vi /etc/udev/rules.d/70-nvidia.rules
# Add the two following lines.
KERNEL=="nvidia", RUN+="/bin/bash -c '/usr/bin/nvidia-smi -L && /bin/chmod 666 /dev/nvidia*'"
KERNEL=="nvidia_uvm", RUN+="/bin/bash -c '/usr/bin/nvidia-modprobe -c0 -u && /bin/chmod 0666 /dev/nvidia-uvm*'"
# Then do an :wq to exit the file.At this point we'll reboot and check our devices:
rebootAfter the reboot, you should have all of your Nvidia devices:
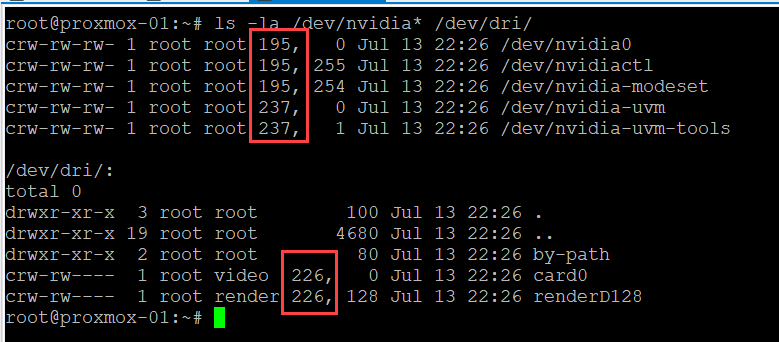
root@proxmox-01:~# ls -la /dev/nvidia* /dev/dri/
crw-rw-rw- 1 root root 195,   0 Jul 13 22:26 /dev/nvidia0
crw-rw-rw- 1 root root 195, 255 Jul 13 22:26 /dev/nvidiactl
crw-rw-rw- 1 root root 195, 254 Jul 13 22:26 /dev/nvidia-modeset
crw-rw-rw- 1 root root 237,   0 Jul 13 22:26 /dev/nvidia-uvm
crw-rw-rw- 1 root root 237,   1 Jul 13 22:26 /dev/nvidia-uvm-tools

/dev/dri/:
total 0
drwxr-xr-x  3 root root        100 Jul 13 22:26 .
drwxr-xr-x 19 root root       4680 Jul 13 22:26 ..
drwxr-xr-x  2 root root         80 Jul 13 22:26 by-path
crw-rw----  1 root video  226,   0 Jul 13 22:26 card0
crw-rw---- 1 root render 226, 128 Jul 13 22:26 renderD128Pay attention to those numbers. You will need them in another step. Please note these will likely be different numbers on your Proxmox installation.
Testing the Nvidia Card on Proxmox
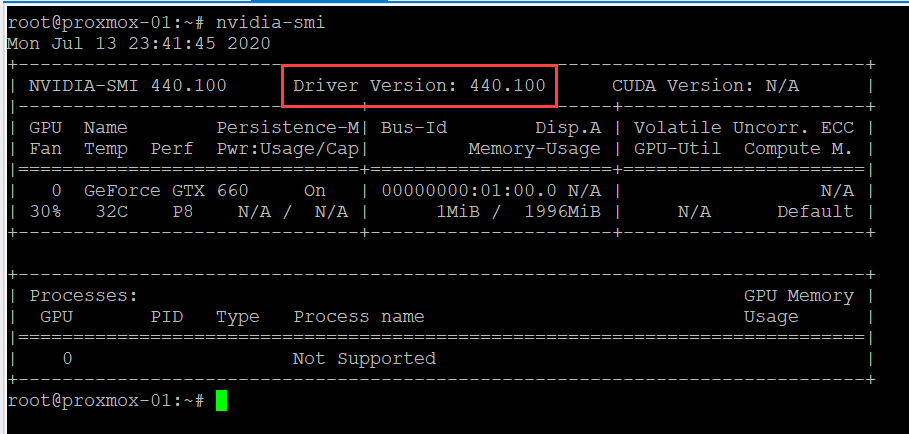
All we need is the nvidia-smi command that we'd previously installed.
# nvidia-smi
Mon Jul 13 22:31:01 2020
+-----------------------------------------------------------------------------+
| NVIDIA-SMI 440.100      Driver Version: 440.100      CUDA Version: N/A      |
|-------------------------------+----------------------+----------------------+
| GPU  Name        Persistence-M| Bus-Id        Disp.A | Volatile Uncorr. ECC |
| Fan  Temp  Perf  Pwr:Usage/Cap|         Memory-Usage | GPU-Util  Compute M. |
|===============================+======================+======================|
|   0  GeForce GTX 660     On   | 00000000:01:00.0 N/A |                  N/A |
| 30%   33C    P8    N/A /  N/A |      1MiB /  1996MiB |     N/A      Default |
+-------------------------------+----------------------+----------------------+

+-----------------------------------------------------------------------------+
| Processes:                                                       GPU Memory |
|  GPU       PID   Type   Process name                             Usage      |
|=============================================================================|
|    0                    Not Supported                                       |
+-----------------------------------------------------------------------------+
Configuring the Arch Linux Container
Modifying the Container Details
You'll first want to power down the container running Arch Linux. We'll be making changes to its configuration file. Log back into Proxmox and search for the container configuration file, e.g. 103.conf. The file should look like this:
arch: amd64
cores: 6
features: fuse=1,mount=nfs;cifs,nesting=1
hostname: example-01
memory: 12288
mp0: /tank/shared,mp=/mnt/tank
net0: name=eth0,bridge=vmbr0,firewall=1,hwaddr=00:0D:AA:BB:CC:DD,ip=dhcp,type=veth
onboot: 1
ostype: archlinux
rootfs: local-zfs:subvol-103-disk-0,size=128G
swap: 512You'll want to add a few lines using those device numbers mentioned above. The lxc.cgroup.devices.allow values will match them. With the same file open, we'll add some additional configuration options:
arch: amd64
cores: 6
features: fuse=1,mount=nfs;cifs,nesting=1
hostname: example-01
memory: 12288
mp0: /tank/shared,mp=/mnt/tank
net0: name=eth0,bridge=vmbr0,firewall=1,hwaddr=00:0D:AA:BB:CC:DD,ip=dhcp,type=veth
onboot: 1
ostype: archlinux
rootfs: local-zfs:subvol-103-disk-0,size=128G
swap: 512
##### New options being added below this. #####
# These should reflect the device numbers from above.
lxc.cgroup.devices.allow: c 226:* rwm
lxc.cgroup.devices.allow: c 195:* rwm
lxc.cgroup.devices.allow: c 237:* rwm
# General container settings.
lxc.apparmor.profile: unconfined
lxc.cgroup.devices.allow: a
lxc.cap.drop:
lxc.autodev: 1
# Mount the devices that we'd previously created.
lxc.mount.entry: /dev/nvidia0 dev/nvidia0 none bind,optional,create=file
lxc.mount.entry: /dev/nvidiactl dev/nvidiactl none bind,optional,create=file
lxc.mount.entry: /dev/nvidia-modeset dev/nvidia-modeset none bind,optional,create=file
lxc.mount.entry: /dev/nvidia-uvm dev/nvidia-uvm none bind,optional,create=file
lxc.mount.entry: /dev/nvidia-uvm-tools dev/nvidia-uvm-tools none bind,optional,create=file
lxc.mount.entry: /dev/dri/card0 dev/dri/card0 none bind,optional,create=file
lxc.mount.entry: /dev/dri/renderD128 dev/dri/renderD128 none bind,optional,create=file
lxc.mount.entry: /dev/fb0 dev/fb0 none bind,optional,create=file
At this point we can power the Arch Linux container back up. SSH into the Arch Linux container, and you should see the devices when doing an ls:
ls -la /dev/nvidia* /dev/dri/*
crw-rw---- 1 root   44 226,   0 Jul 13 22:26 /dev/dri/card0
crw-rw---- 1 root  108 226, 128 Jul 13 22:26 /dev/dri/renderD128
crw-rw-rw- 1 root root 195, 254 Jul 13 22:26 /dev/nvidia-modeset
crw-rw-rw- 1 root root 237,   0 Jul 13 22:26 /dev/nvidia-uvm
crw-rw-rw- 1 root root 237,   1 Jul 13 22:26 /dev/nvidia-uvm-tools
crw-rw-rw- 1 root root 195,   0 Jul 13 22:26 /dev/nvidia0
crw-rw-rw- 1 root root 195, 255 Jul 13 22:26 /dev/nvidiactl
Installing the Nvidia Driver on Arch Linux
We'll now be installing the Nvidia drivers for Arch Linux, minus any kernel modules. We'll first need to download the driver from Nvidia's website. This part is extremely important: the Nvidia driver version on Arch Linux must match the version in Proxmox. According to the output from nvidia-smi in the previous step, we are running version 440.100 of the driver.
Go to the Nvidia Drivers Downloads site and search for the correct driver for your card. You'll likely want Linux 64-bit for the operating system. Select the version that matches the Proxmox version of the Nvidia driver, click on Downloads, and then right-click on the next Download button to copy the URL. You can also change the version numbers in the URL if needed. For example:
http://us.download.nvidia.com/XFree86/Linux-x86_64/440.100/NVIDIA-Linux-x86_64-440.100.run
Once you have the URL and you're logging into your Arch Linux container, run the following commands:
pacman -S wget
cd /tmp
wget http://us.download.nvidia.com/XFree86/Linux-x86_64/440.100/NVIDIA-Linux-x86_64-440.100.run
cd /tmp
# It's important that you use --no-kernel-module
bash ./NVIDIA-Linux-x86_64-440.100.run --no-kernel-moduleYou should be able to use the default answers. Once complete, we'll now have the Nvidia-related devices and tools available in the Arch Linux container.
Testing the Video Card
Assuming everything was configured correctly, we should be able to get the same results as Proxmox when running the nvidia-smi command. From Arch Linux:
nvidia-smi
Mon Jul 13 23:57:54 2020
+-----------------------------------------------------------------------------+
| NVIDIA-SMI 440.100      Driver Version: 440.100      CUDA Version: 10.2     |
|-------------------------------+----------------------+----------------------+
| GPU  Name        Persistence-M| Bus-Id        Disp.A | Volatile Uncorr. ECC |
| Fan  Temp  Perf  Pwr:Usage/Cap|         Memory-Usage | GPU-Util  Compute M. |
|===============================+======================+======================|
|   0  GeForce GTX 660     Off  | 00000000:01:00.0 N/A |                  N/A |
| 30%   32C    P8    N/A /  N/A |      1MiB /  1996MiB |     N/A      Default |
+-------------------------------+----------------------+----------------------+

+-----------------------------------------------------------------------------+
| Processes:                                                       GPU Memory |
|  GPU       PID   Type   Process name                             Usage      |
|=============================================================================|
|    0                    Not Supported                                       |
+-----------------------------------------------------------------------------+
Success! Hope this helps.