
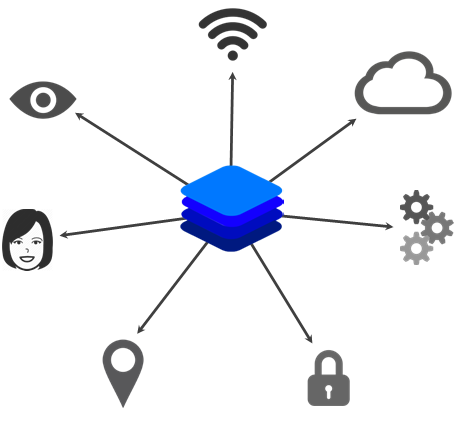
Summary
I'm a fan of Blue Iris for security camera recording. It's relatively easy to configure, supports a ton of cameras, and constantly adds new features. However, the downside is that it's robust motion detection is just that: motion detection. You'll get alerts on shadows, trees moving, cars driving, by etc. Me? I just want to get alerted on certain objects like people, cars, and the occasional bicycle. I don't care about the generic motion alerts.
Enter DeepStack for object-based detection, which has recently been incorporated into Blue Iris. Blue Iris will detect generic motion, pass it to DeepStack for further analysis, and DeepStack will let you know if there's an actual person, bike, vehicle, etc in the video capture that's being analyzed. Each Blue Iris camera has configurable settings around the types of DeepStack detection too.
Now, there is a version of DeepStack that runs on Windows. You could technically have Blue Iris side-by-side with DeepStack on the Windows server if you've got enough horsepower for both. Unfortunately I don't. Instead, I'm going to be running DeepStack on my Arch Linux Docker server that has some free resources.
This guide will walk you through the configuration steps.
Configuring DeepStack in Docker
Keep in mind that I'm assuming that you already have a server running Docker. This Docker server is where we'll be running the DeepStack container. You'll need two components, docker and docker-compose, to get this deployed. The first step is to create a "home directory" where DeepStack will like: one for the docker-compose.yml file, the other for the DeepStack storage directory.
Create the initial directories:
sudo mkdir -p /opt/dockerfiles/deepstack/
sudo mkdir -p /opt/deepstack/
Create the initial .env file for docker-compose:
sudo vi /opt/dockerfiles/deepstack/.env

# Add the following to the file. Customize as needed.
# Your timezone, https://en.wikipedia.org/wiki/List_of_tz_database_time_zones
TZ=America/Detroit
PUID=1000
PGID=1000
# The directory where data and configuration will be stored.
ROOT=/opt
Next create the docker-compose.yml file that you'll need. Please note that you can customize the port15000 for where you'll connect from Blue Iris. For example, if your Docker server is docker.env.internal, then your DeepStack server would reside at http://docker.env.internal:15000.
vi /opt/dockerfiles/deepstack/docker-compose.yml

# Add the following lines to the file.

version: "3.3"

services:
  deepstack:
    image: deepquestai/deepstack:latest
    restart: unless-stopped
    container_name: deepstack
    ports:
      - "15000:5000"
    environment:
      - TZ=${TZ}
      - PUID=${PUID}
      - PGID=${PGID}
      - VISION-SCENE=True
      - VISION-FACE=True
      - VISION-DETECTION=True
    volumes:
      - ${ROOT}/deepstack:/datastore
The next step is enabling the DeepStack container. Simply do the following:
cd /opt/dockerfiles/deepstack

# To bring up the stack:
sudo docker-compose up -d

# To take down the stack:
sudo docker-compose down

# To watch the logs from the container:
sudo docker logs -f deepstacker

# Ultimately you'll want to bring up the container though:
sudo docker-compose up -d
...and bam, you should have a DeepStack container running in Docker. Keep in mind this is the CPU version. It's fast enough and not as picky as the GPU version. You'll eventually see the screenshot below if you run the logs command above while Blue Iris is detecting motion.
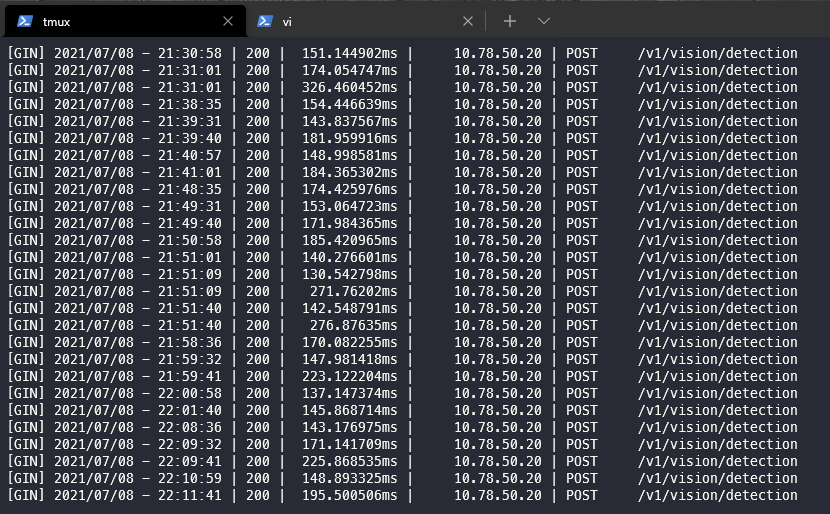
Each one of those lines is a request submitted to DeepStack from Blue Iris, along with the time it took to process the image. Now, let's configure Blue Iris to connect to the DeepStack server.
Configuring Blue Iris to Connect to DeepStack
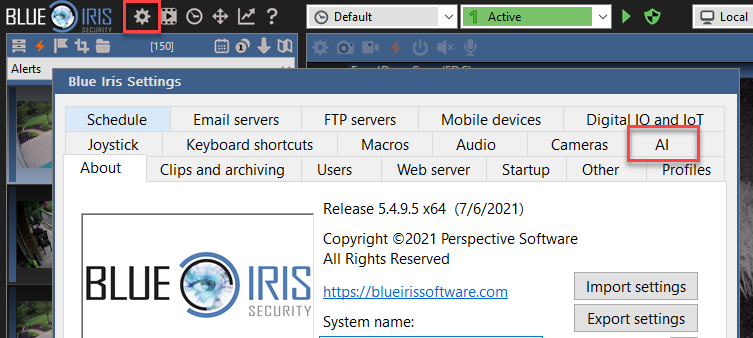
This is part is simple. Go into Blue Iris and click on the settings icon. When the menu pops up, click on the AI tab.
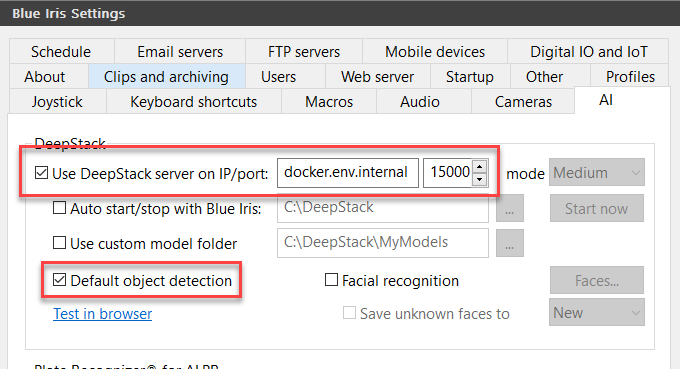
You'd then plug in the DeepStack settings for Blue Iris. There isn't much to this. The DeepStack server on IP/port: should be the hostname of the docker server, followed by the port you'd configured, e.g. docker.env.internal and 15000. Make sure the items in the screenshot below are checked.
Finally, click OK on the bottom. Next you'll need to configure each camera to utilize the DeepStack integration. It's not difficult: motion is detected by Blue Iris, Blue Iris sends the image to DeepStack, DeepStack sends the results back to Blue Iris, and Blue Iris determines if it's an alert.
Open up the camera settings, go to Trigger, and ensure Motion sensor is checked. You can then click on Configure.
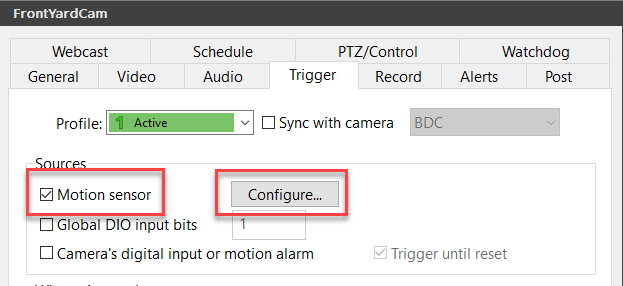
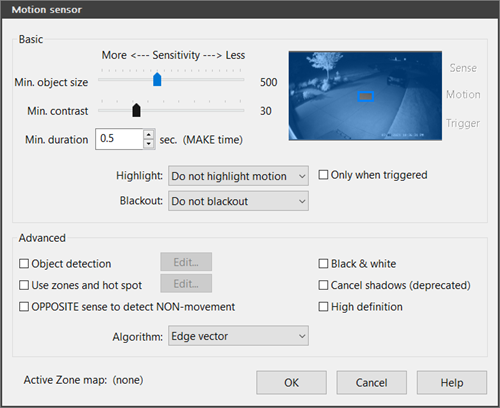
I just keep mine at reasonable defaults to ensure general motion will trigger the motion sensor. You can keep everything else unchecked unless you actually need it.
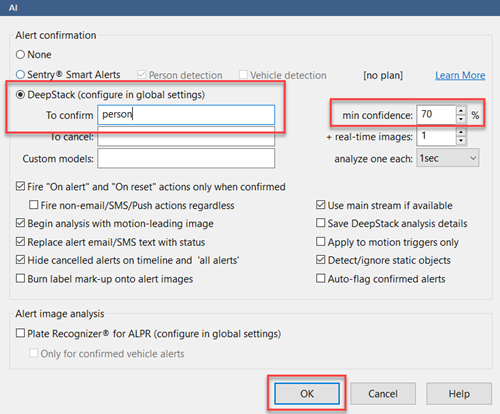
Click OK when done. Next, click on the Artificial Intelligence... button on the Trigger tab for the camera.

On in the Artificial Intelligence section, there are only a few items that need to be changed. I'd recommend changing To confirm to just person if you only care about person detection. You can also change the minimum confidence. I've had good luck with 70%. Everything else can be left at defaults. Click OK when done.
Click OK again on the camera settings screen from before. You'll see the camera feed quickly restart. Congrats, you have DeepStack enabled for the camera.
What Happens Next?
Well, when a generic motion alert happens, you'll notice a few things:
- The thumbnail for the alert will briefly appear in the alerts list in Blue Iris.
- It'll (1) sit there for a second and disappear, or (2) remain in the alert list with a
person:N%listed next to the thumbnail.
The TL;DR version is that any motion alerts not matching the DeepStack detection will get removed from the alert list, e.g. the alert only persists if DeepStack says there's a 78% chance that there's a person in the fame. Much better detection, and almost zero false positives. Hope this helps!